- Getting Started
- Recommended Integration & Registration Flow
- Admin Console Overview
- User Onboarding and Management
- User Registration and Login
- Enterprise Applications
- Microsoft Integration
- Installing TraitWare PAM Module for SSH and SFTP
Microsoft/Azure – Federation to TraitWare
Posted on April 25, 2019
Overview
In order to use SAML with Azure and other linked Microsoft products, you will be required to federate the domain(s) that will be protected by TraitWare. The users will need to be synced from your AD in order to successfully sign in to Azure linked applications. Make sure that you are setting everything up using an active Azure Subscription.
**Please note that if you wish to test the federation on limited users, you will need to have multiple domains.
Preparing Azure
Make sure that you have more than one verified domain. Federation requires that one domain remains unfederated (your Primary Managed domain). A Powershell Script will be run to complete federation.
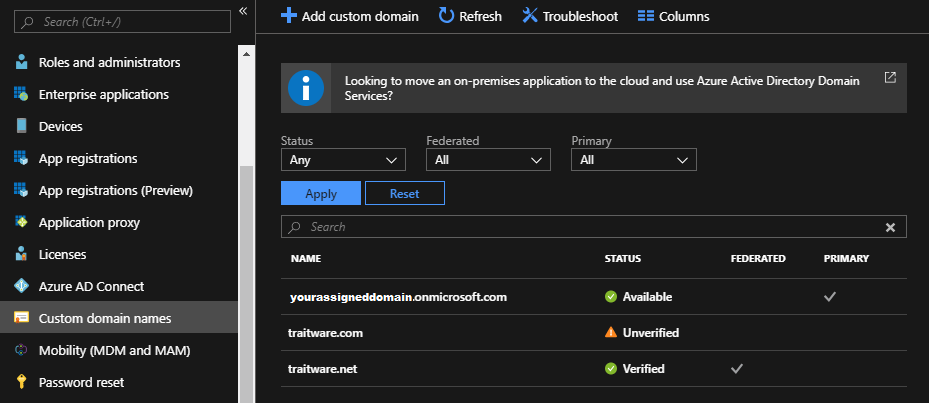
This domain can be your assigned tenant domain (###.onmicrosoft.com) or any other domain which you own. You can federate multiple domains, but not all of your existing domains.
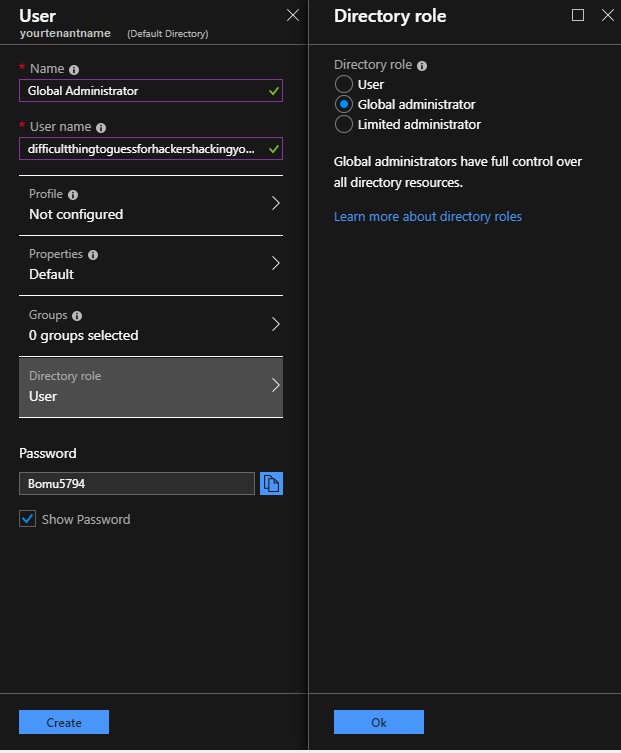
Add/Assign Global Administrator
Next, you will want to add a global administrator. This user will not be federated, so please make the username(email) and password difficult to guess. If you have a global user setup, you can skip to Setting up users for Testing.
Navigate to Azure Active Directory → Users → + New User
Fill in the appropriate information for the Name and User name (email)
Select Directory role and change to Global administrator then select Ok.
Check the box to Show Password unless you plan to setup email then select Create
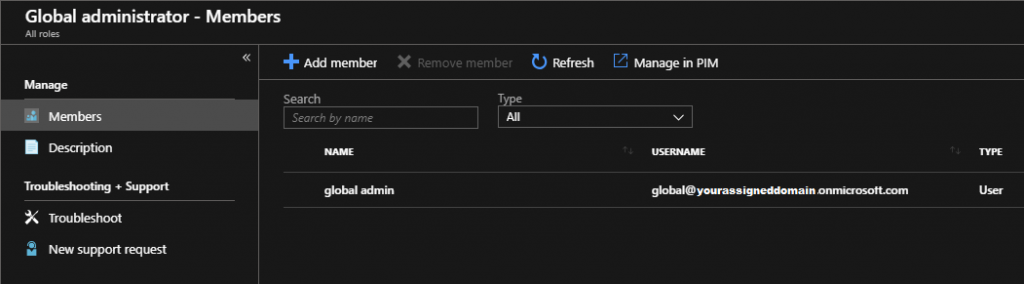
If you already have an existing user that you wish to add as a global administrator, navigate to Azure Active Directory → Roles and administrators → Global administrator
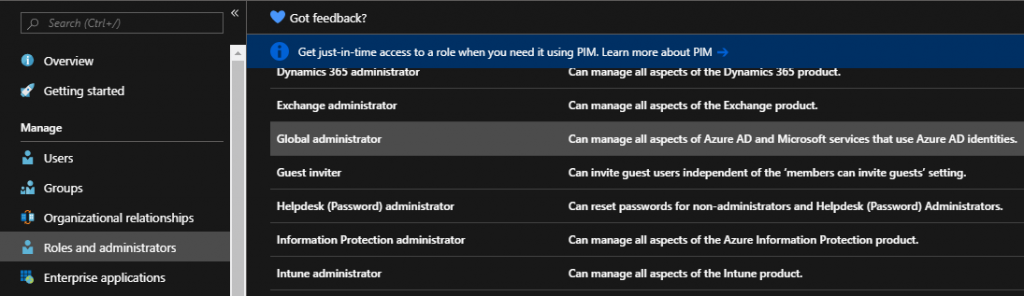
Select + Add member and search for the appropriate user to add as a member
Whether adding an existing user as Global administrator or creating a new user, it is highly recommended to create a password that is very difficult to guess
Setting up users for Testing
Once a domain is federated with TraitWare, all users on that domain will be required to use TraitWare (Microsoft simply looks for the @federateddomain.com and redirects)
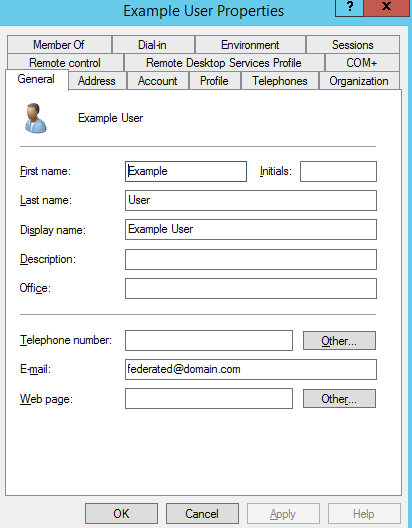
The best way to move people over in groups is to add a second domain and federate it. As testing begins, a federated email can be added to the Authentication contact info Email field in Azure or in the Email field of the AD User Properties (see below).
**Please note that unless you have an on-premise AD, adding users to the federated domain in Azure will require the domain to be unfederated while the users are updated. If you are adding new users, TraitWare has created a Graph API to allow for cloud users to be added without unfederating the domain(s). Alternately, if a user has a O365 license, you will be able to add a domain as an alias and make it the primary.
If you have a group of users that you know will be testing, they can either be updated in your on-prem AD (make sure you’ve added all verified domains to the UPN), or directly in Azure.
**Please note that unless the User Name is the federated domain, this will still be a backdoor to use a password to sign in.
For on-premise machines, make sure an email with the federated domain is in the Email (UPN) field.
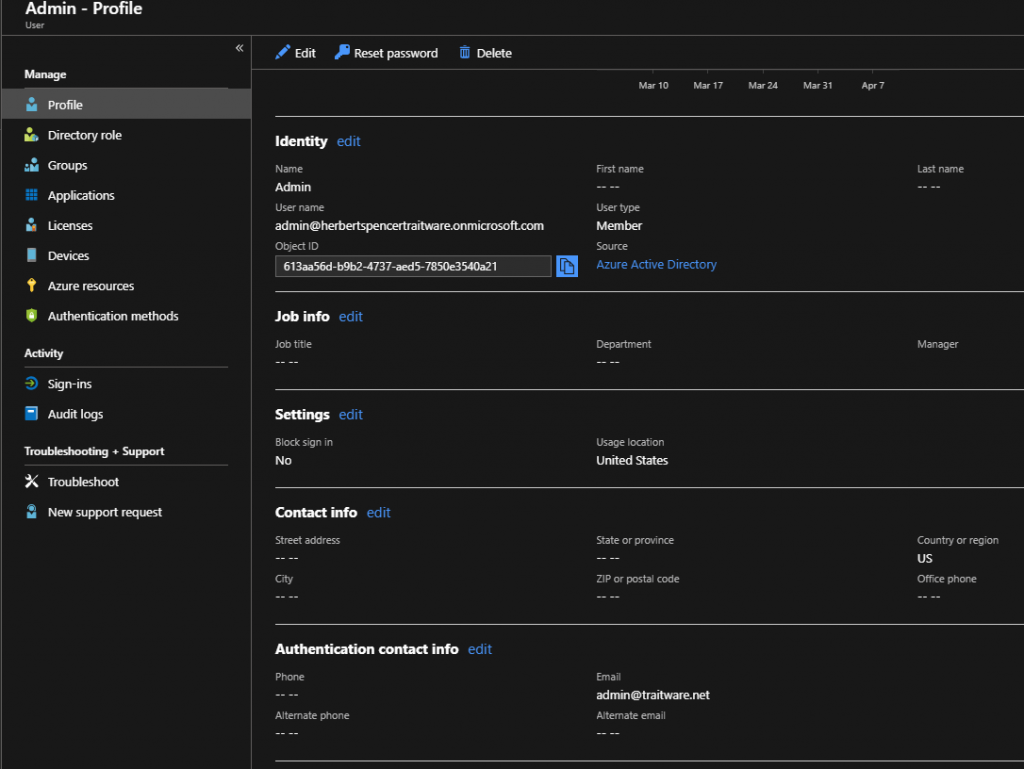
For Azure cloud management, make sure the federated domain is added to the Authentication contact info field by selecting Edit and filling in the proper information under Email.
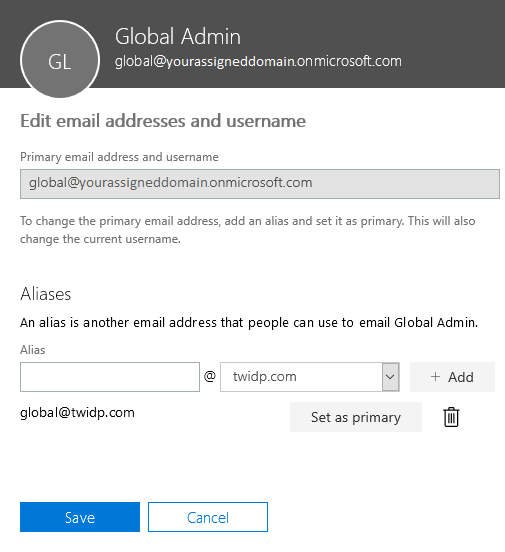
If a user has a license for an O365 mailbox, they will be able to keep their existing domain and add the federated domain as an alias. When the federated domain is added, you will be able to Set as Primary domain. You then have the option to remove the previous primary domain to close backdoors.
Running the Powershell Script
In order to run the Powershell Script, make sure you have the following items setup:
- Global User Created
- More than one verified domain
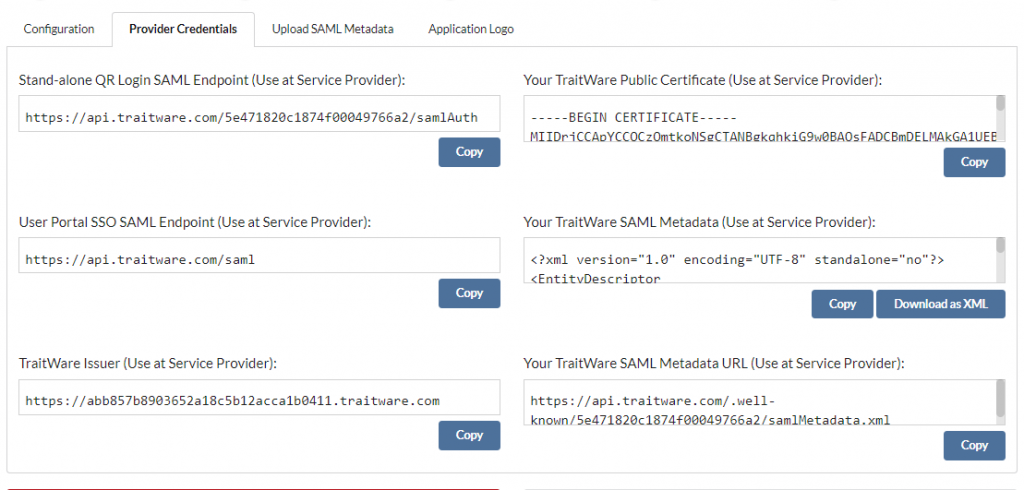
- Your TraitWare SAML Endpoint
- Your TraitWare SAML Signing Certificate
- Your TraitWare Issuer
Once you have the required material, open Powershell (ISE is recommended for ease of use).
If you have not done so already, you will need to install the MsOnline Module in Powershell by running the following command:
Install-Module MsOnline
Select Yes to all and let the scripts run. Once that is complete, you will be able to connect to Azure using your Global Admin credentials. Run the following:
Connect-MsolService
A window will open up, enter your Global Admin username and password. The next step will federate your domain:
Set-MsolDomainAuthentication -Authentication Federated -DomainName yourdomain.com -IssuerUri https://YOURURI.traitware.com -LogOffUri https://portal.office.com -PassiveLogOnUri https://api.traitware.com/YOURACCOUNT/samlAuth -SigningCertificate "YOURCERTINFORMATION" -PreferredAuthenticationProtocol SAMLP
An example of this would be:
Set-MsolDomainAuthentication -Authentication Federated -DomainName somedomain.com -IssuerUri https://88ed040f982e572164d9645d5e98554.traitware.com -LogOffUri https://portal.office.com -PassiveLogOnUri https://api.traitware.com/2e7bc52d1a7de87954de8877/samlAuth -SigningCertificate "-----BEGIN CERTIFICATE-----
MIIDrjCCApYCCQCzQmtkoNSgCTANBgkqhkiG9w0BAQsFADCBmDELMAkGA1UEBhMCVVMxEzARBgNVBAgMCkNhbGlmb3JuaWExFDASBgNVBAcMC05ldmFkYSBDaXR5MRIwEAYDVQQKDAlUcmFpdFdhcmUxDDAKBgNVBAsMA0lEUDEWMBQGA1UEAwwNdHJhaXR3YXJlLmNvbTEkMCIGCSqGSIb3DQEJARYVc3VwcG9ydEB0cmFpdHdhcmUuY29tMB4XDTE4MTExOTIxNDM0MloXDTI4MTExNjIxNDM0MlowgZgxCzAJBgNVBAYTAlVTMRMwEQYDVQQIDApDYWxpZm9ybmlhMRQwEgYDVQQHDAtOZXZhZGEgQ2l0eTESMBAGA1UECgwJVHJhaXRXYXJlMQwwCgYDVQQLDANJRFAxFjAUBgNVBAMMDXRyYWl0d2FyZS5jb20xJDAiBgkqhkiG9w0BCQEWFXN1cHBvcnRAdHJhaXR3YXJlLmNvbTCCASIwDQYJKoZIhvcNAQEBBQADggEPADCCAQoCggEBAK/GwBauAinkRfhbNLn4rPEUU6p4JyWOODyWLgjTQufBFIGS37fyzVqM4pNiWn2FpByzJocf+Cc6IZ+5IHm0eH98asHnE+cKQLdXMJiwP/z1k8ZhUjK0lRyoDFJsL+zi7r5u6g1dSGL+nqAgdFxsedxgEw6uGBp0QWYsgraqOt3JLFO7HD+zysKtrihbg9Gdqx02ROd7HeFk2h8fDxA2sUCHO90zqokM
KqLag42ze4zPayy4K5PsQ+ihLhXWqTq5azEi4Yo9E0QfYIMpqXgHMIXgwdYp2E2K6phnsH9tQCSYeqH4jAU4T1o+2PigHfnYzMpwienx+lQsJ1ode9mFpXECAwEAATANBgkqhkiG9w0BAQsFAAOCAQEAnpNNkESZCU+QnJVNsEsn5Xa9v7iNJ/4J68XzU9EICZ1mtCNLa+v0OtSulBVnpJgjs3K6KSMTAzIm4y80qhHaPOqr2iiXh36PZatapqxZQBqMyXCTai6Q8wnMiwJl8NWxKhnzrPnbGup68Fu9FppvrbL9ITom7g4TiJyR8YaYW4SR/4v0rn49f4WtR42jZO/Qxy2W4LIpmATZjl/R7tXlCm2Q6g2A/3OAyJ67HaprL+pYo2RB0TEsugF584T4CcWAljLC2S5a0vBS0cNknJKNBSW/A3SVEYLw0IlL4OyJYQUkkbbeSihEx6Cw83GFlLMhXHhPcTFv44Hu0Bq4Z3dlCg==
-----END CERTIFICATE-----" -PreferredAuthenticationProtocol SAMLP
If you ever need to change your domain back to managed, run the following after Connect-MsolService:
Set-MsolDomainAuthentication -Authentication Managed -DomainName domain.com
TraitWare SAML Requirement Materials
You can obtain your TraitWare SAML Endpoint and Signing Certificate by navigating to https://admin.traitware.com and signing in with your existing TraitWare account. If you are a new admin user and do not have a TraitWare account, please contact us at support@traitware.com, otherwise, contact your company administrator.
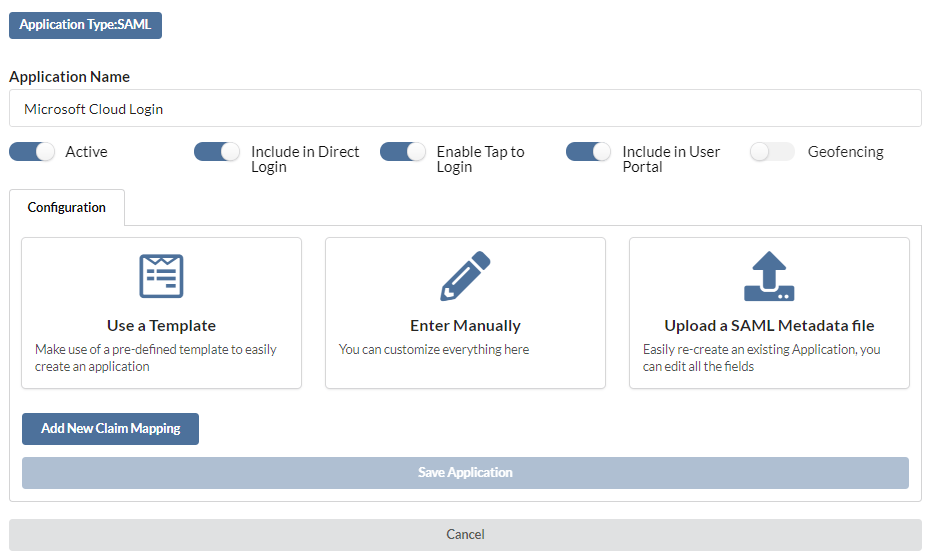
After scanning to sign in, navigate to Applications→ + Add Applications

Choose the Application Type desired type (SAML). Choose a recognizable Name for your application. Choose Use a Template

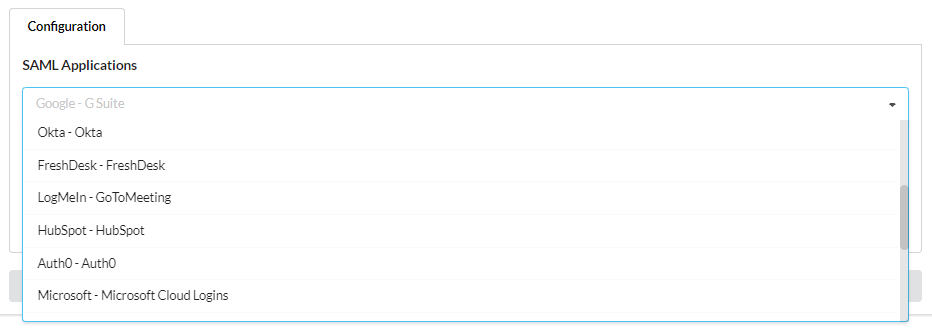
Complete application setup by selecting the appropriate application (Microsoft Cloud Logins) from the approved list.
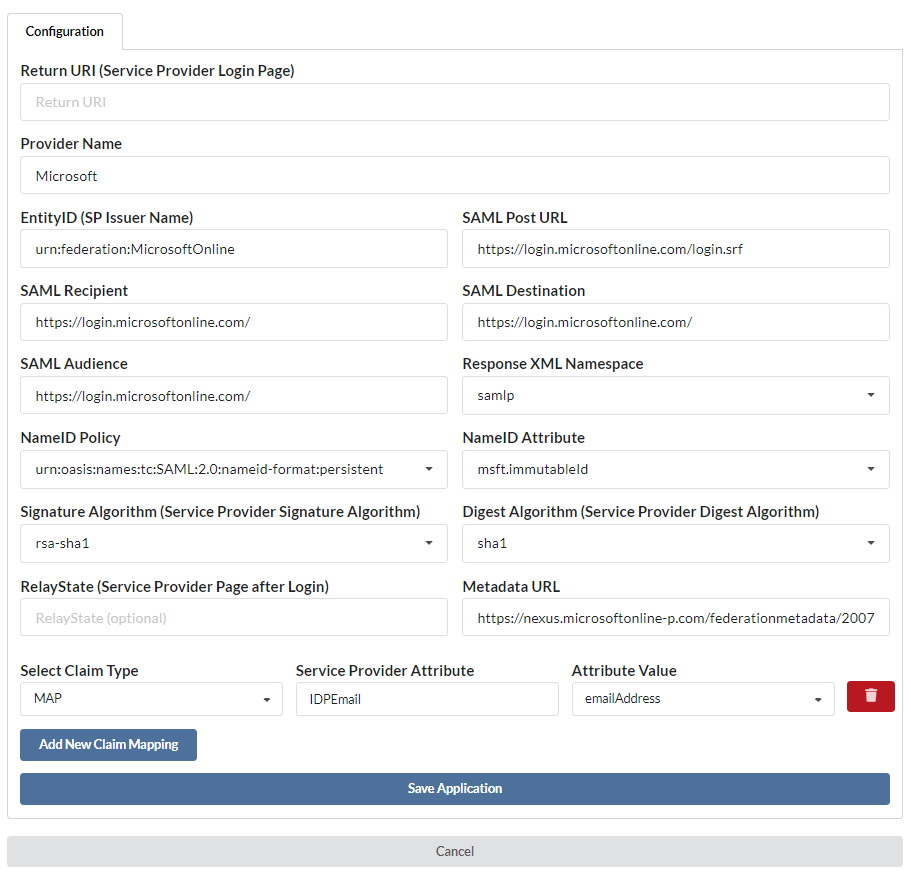
The fields will populate. Microsoft will not require any additional changes to be made. Please be aware that some applications will require personalization to your specific information.
Select Save Application when you are finished. Open the application and navigate to Provider Credentials.