- Getting Started
- Recommended Integration & Registration Flow
- Admin Console Overview
- User Onboarding and Management
- User Registration and Login
- Enterprise Applications
- Microsoft Integration
- Installing TraitWare PAM Module for SSH and SFTP
Microsoft/Azure – Federation to TraitWare
Posted on May 1, 2024
Overview
In order to use TraitWare to sign into Microsoft online products, it is required to federate the domain. Please ensure that the previous GraphAPI sync to TraitWare is configured and functioning.
Note: Microsoft federation is domain level. Non-disruptive user testing requires a secondary domain.
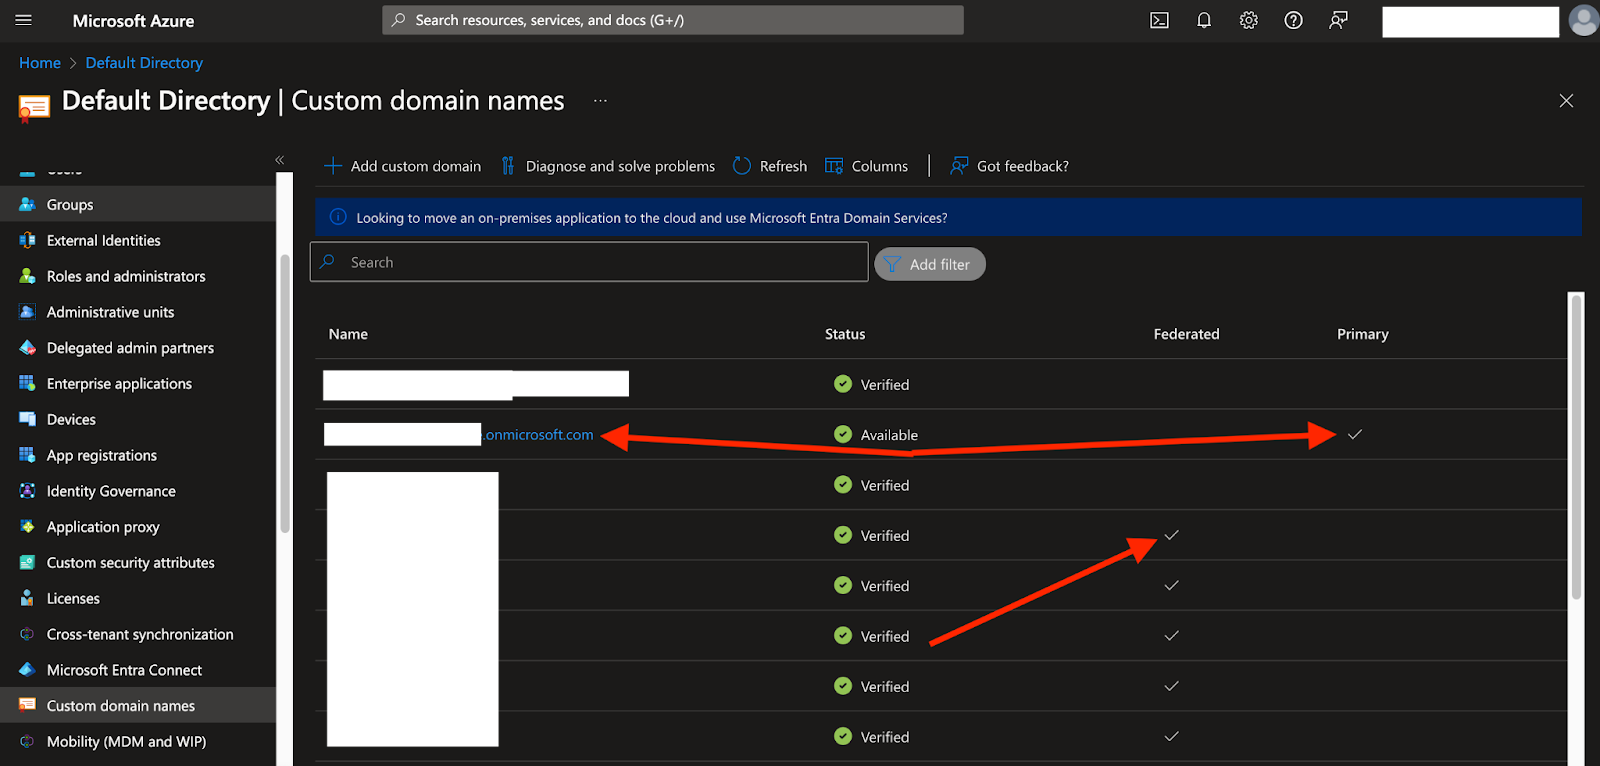
Preparing Azure
- Make sure the account has more than one verified domain. Federation requires that one domain remains unfederated (Primary Managed domain). TraitWare recommends selecting the .onmicrosoft.com domain as the primary. A Powershell Script will be run to complete federation.
Add/Assign Global Administrator
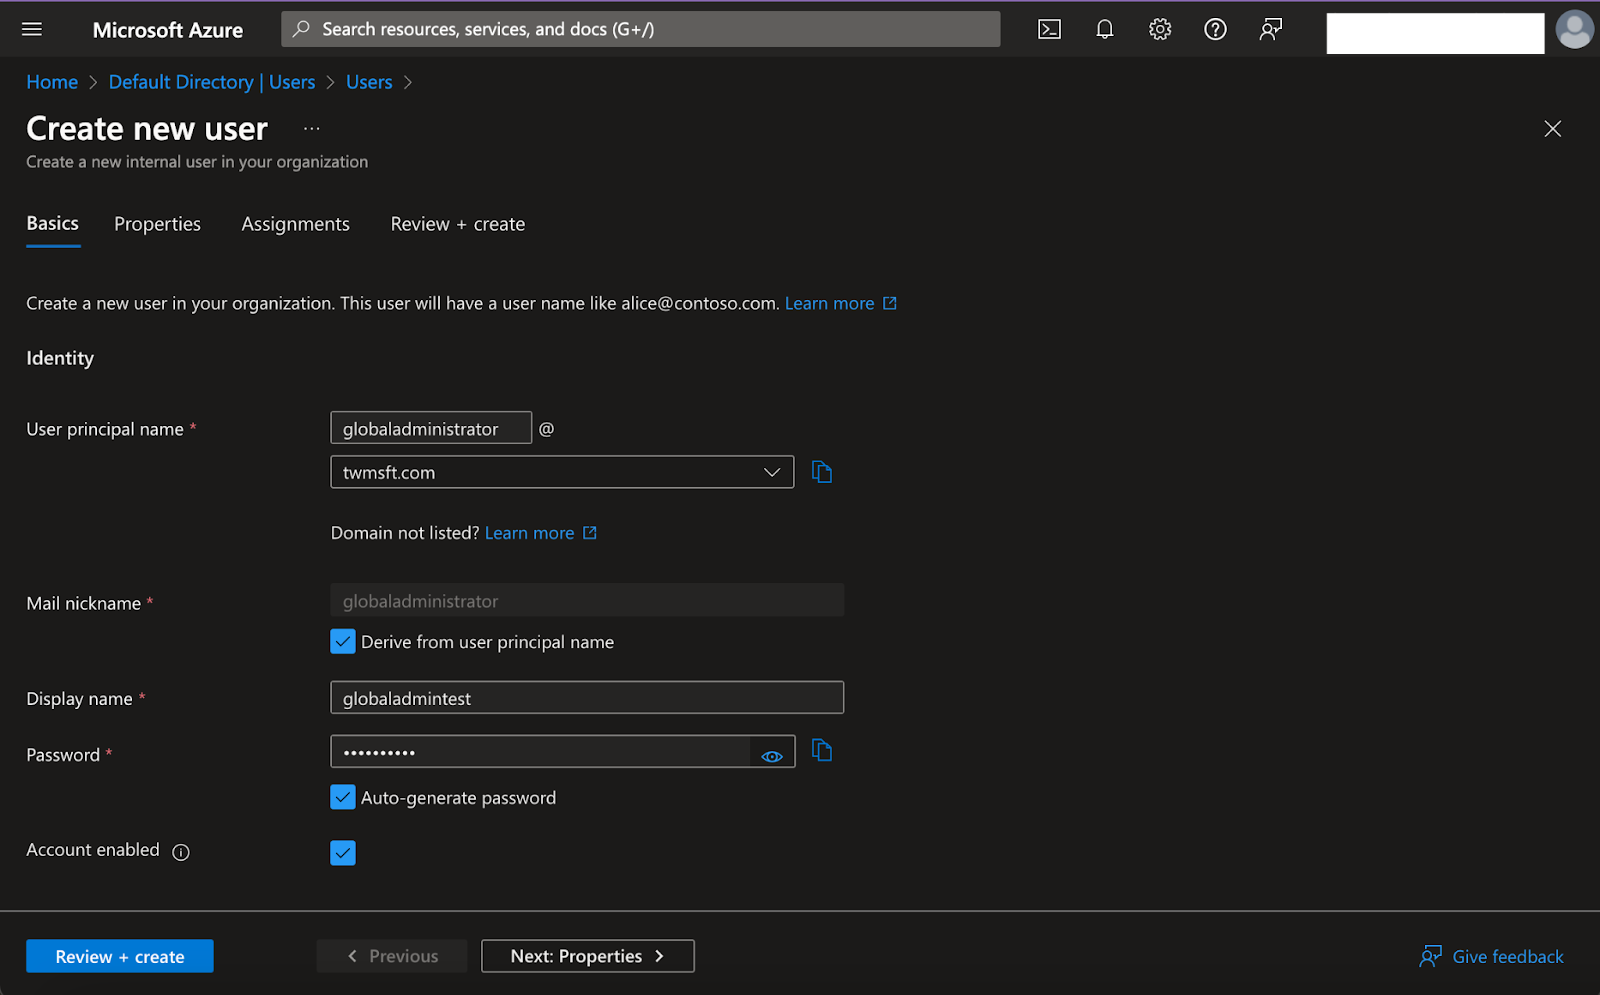
- Next, add a Global Administrator. This user will not use TraitWare to sign in. This account does not require licenses from Microsoft. If there is already a global user setup, skip to Setting up users for Testing.
- Navigate to Entra ID → Users → + New User
- Fill in the appropriate information for the Name and User name (email)
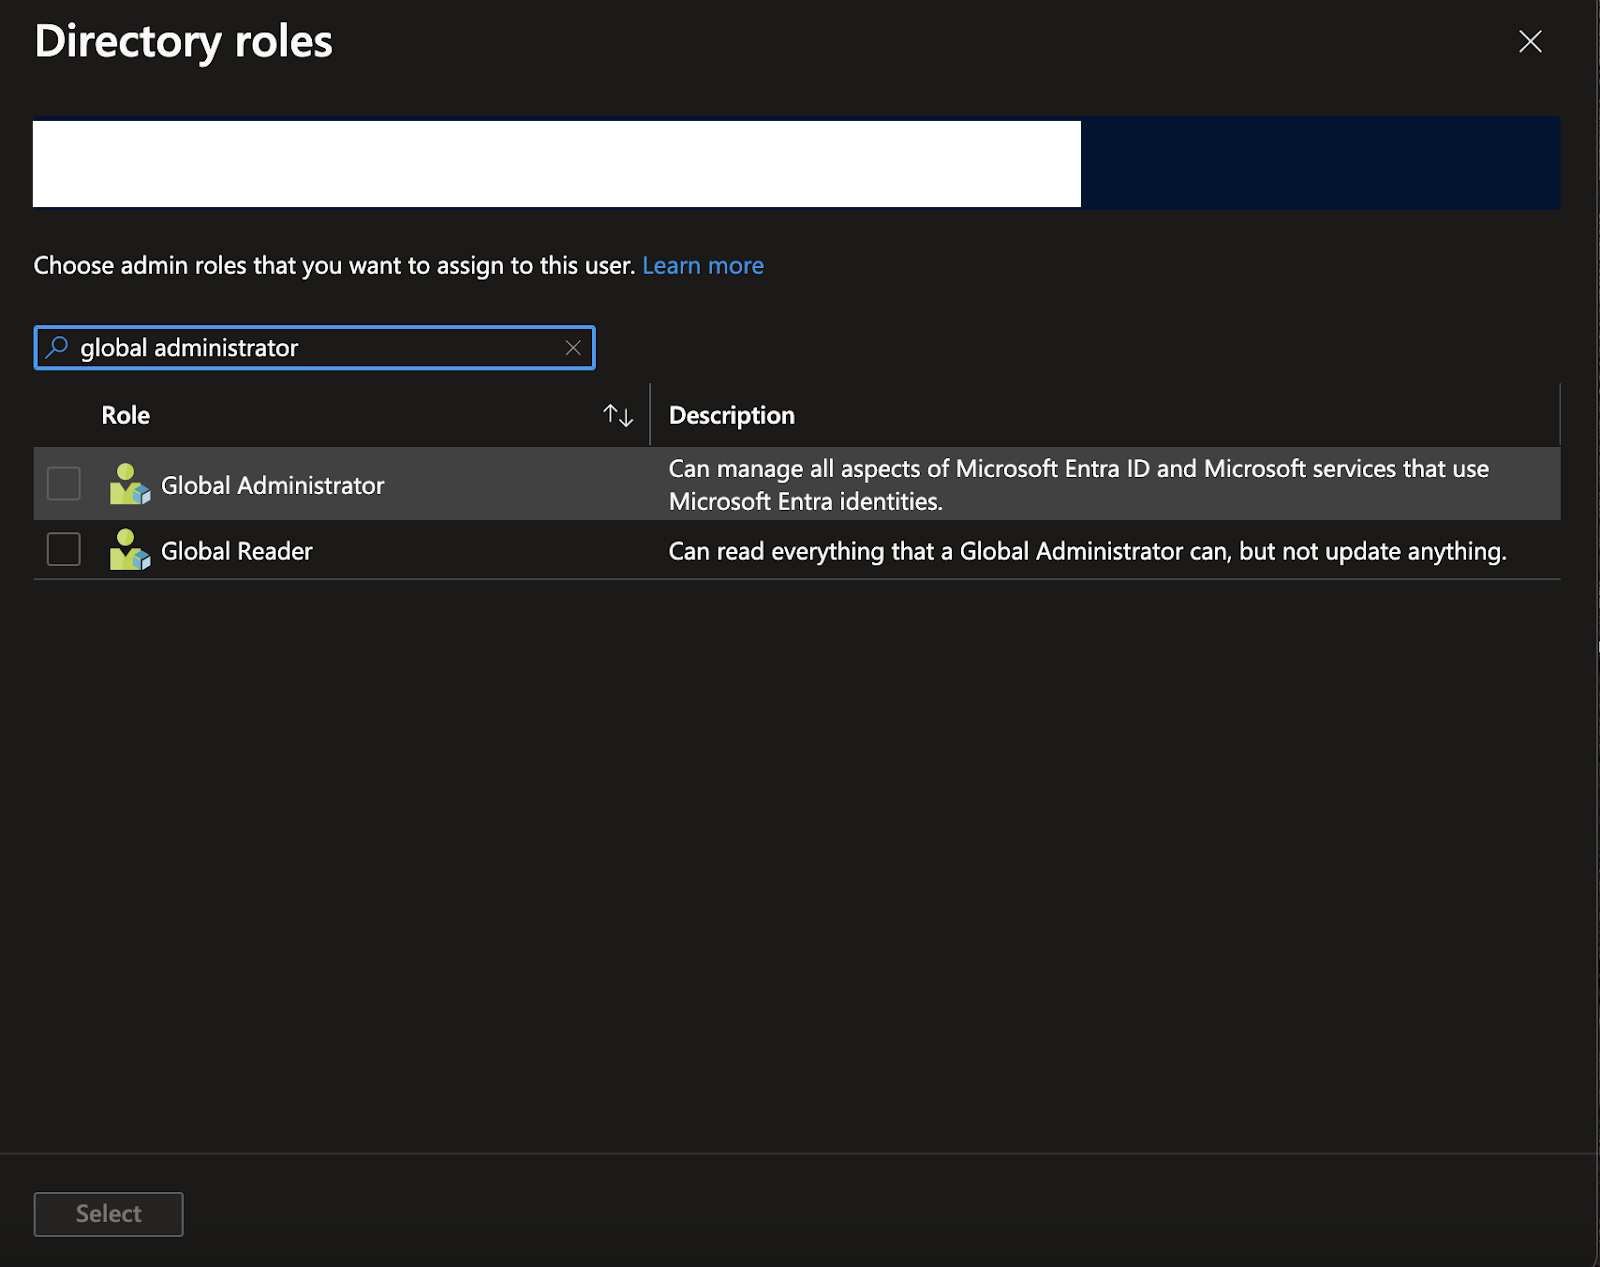
- Select Assignments, Add role and change to Global Administrator then select Ok. Then select Review + Create
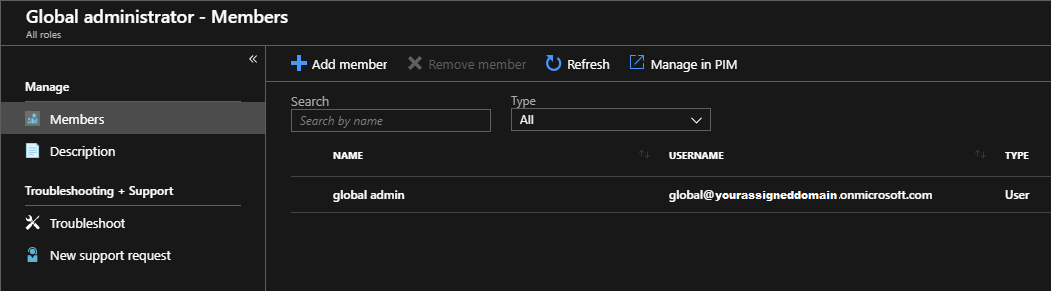
- If the account already has an existing user that is preferred as the global administrator, navigate to Entra ID → Roles and administrators → Global Administrator
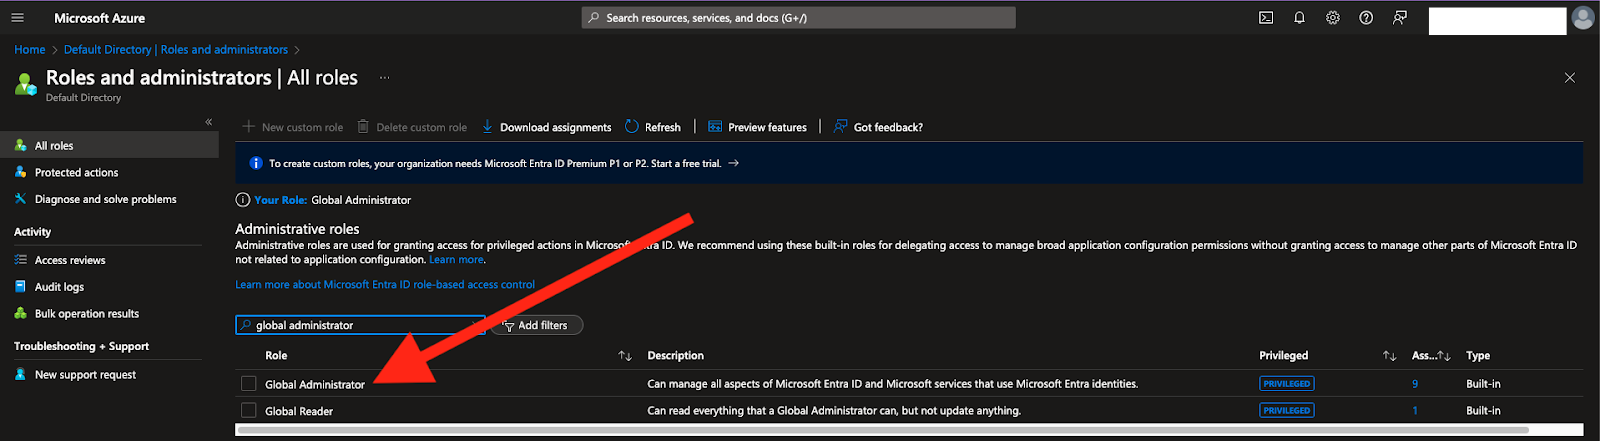
- Select + Add member and search for the appropriate user to add as a member
**Note: It is highly recommended to use security best practices when creating a password.
Create Microsoft Application
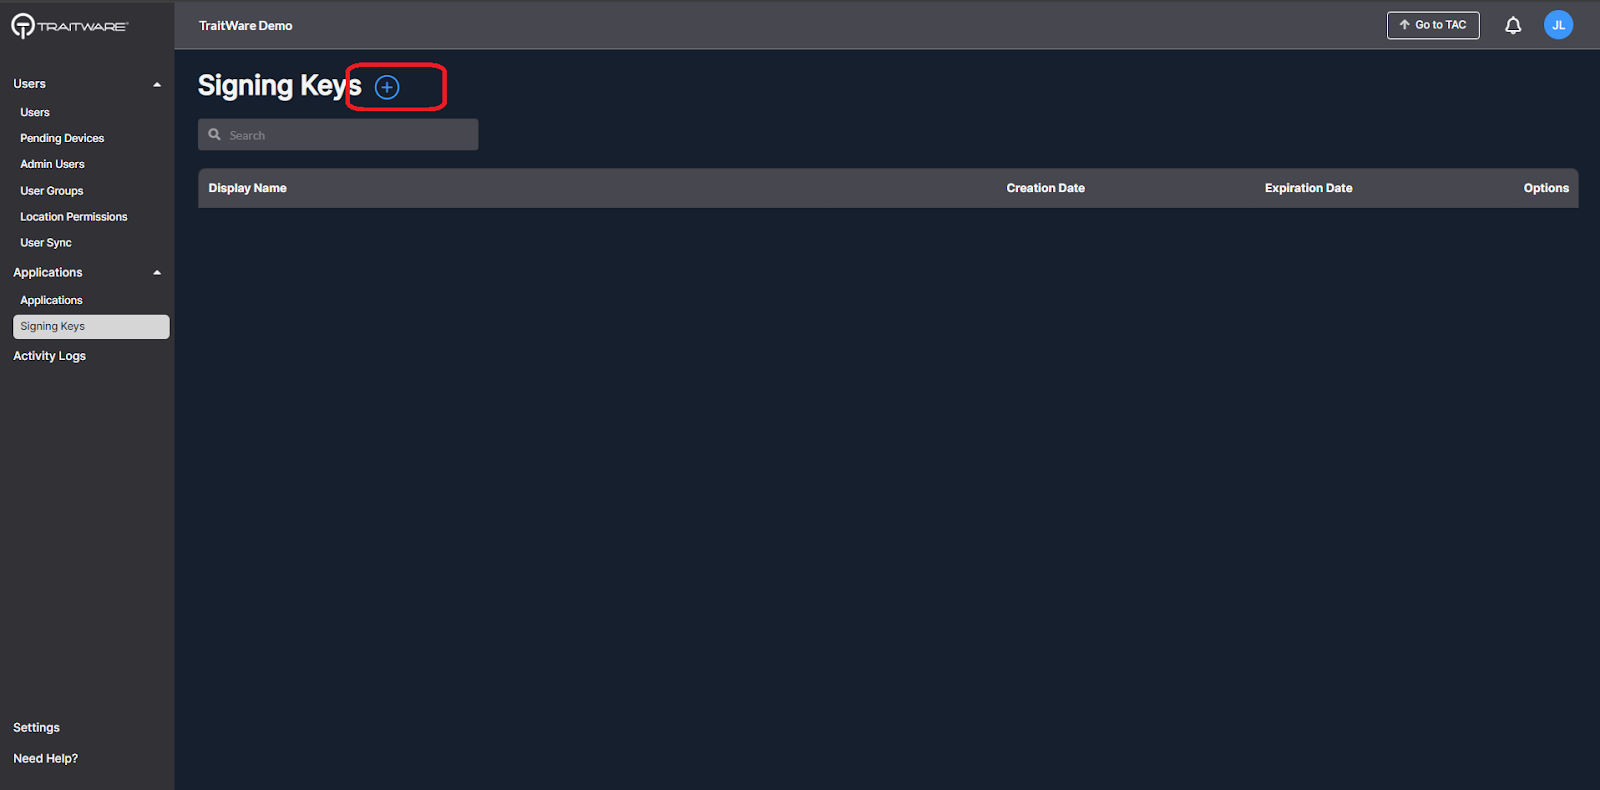
Create Signing Key:
- Navigate to the Signing Keys at the applications menu of the TratiWare console. Click the plus sign to add a new signing key.
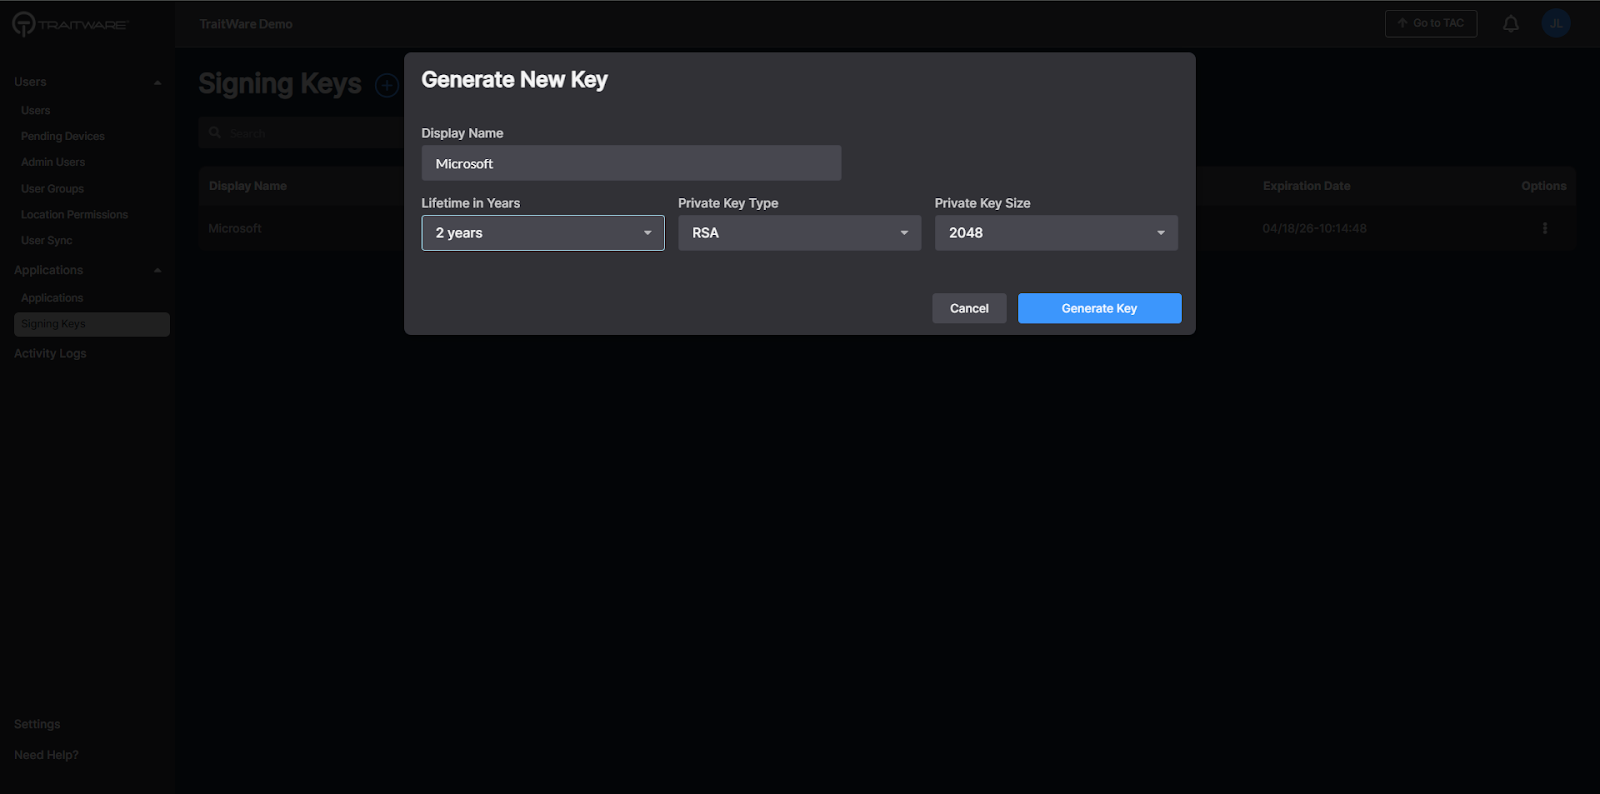
- Enter display name, select desired Lifetime in Years. Click Generate Key.
- Create Application.
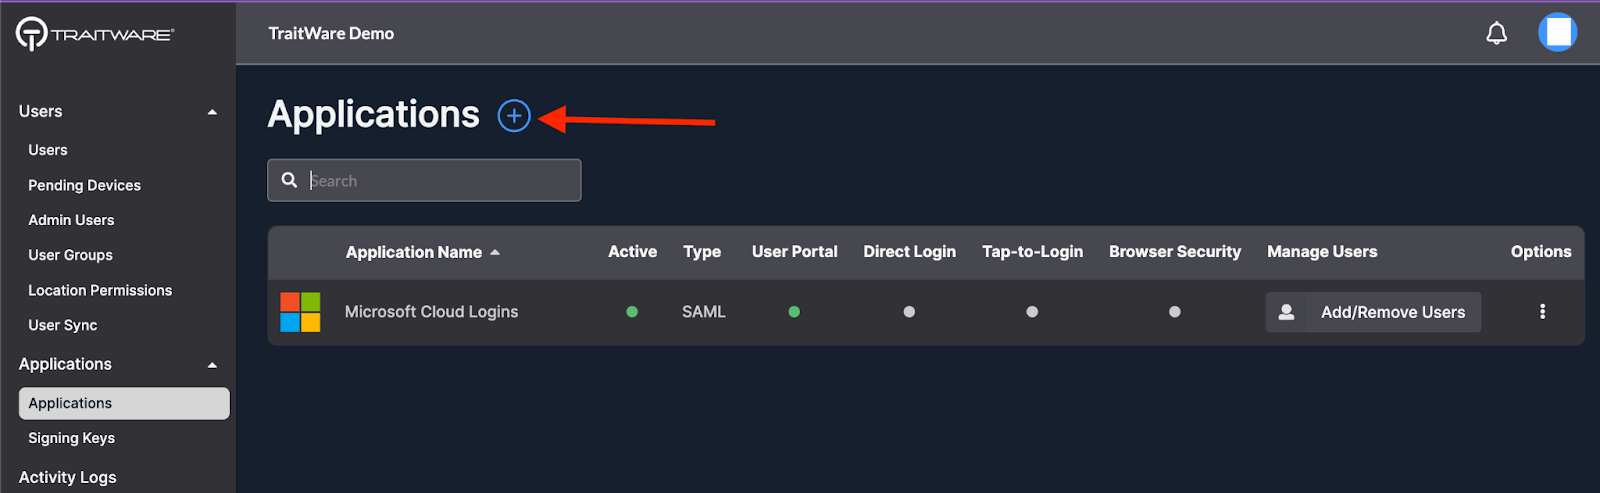
- Choose the SAML application type.
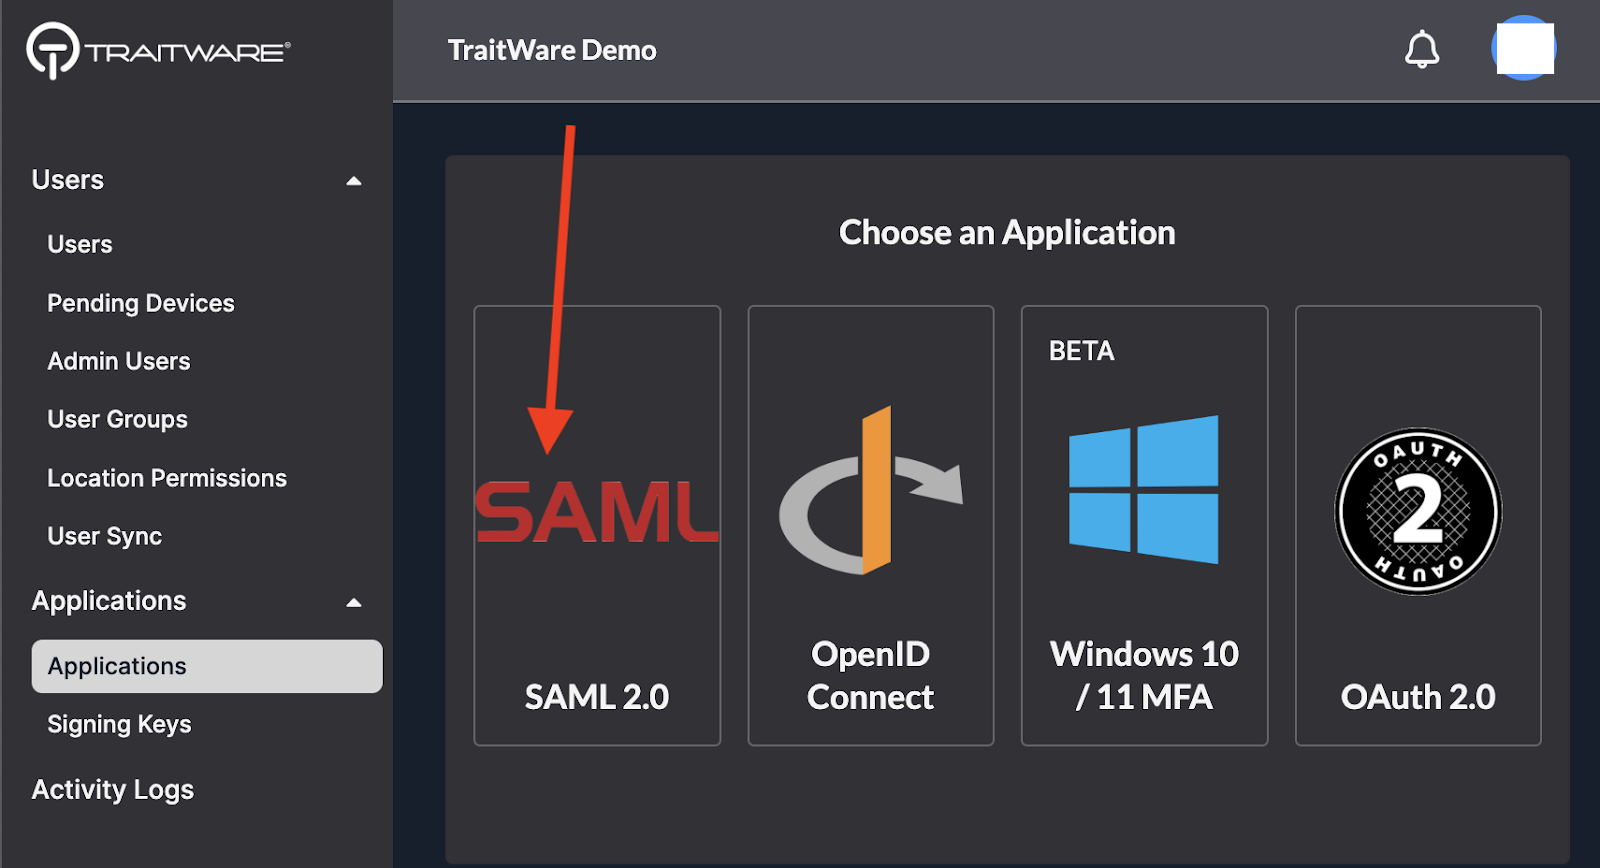
- Enter the Name for the application. Select Use a Template.
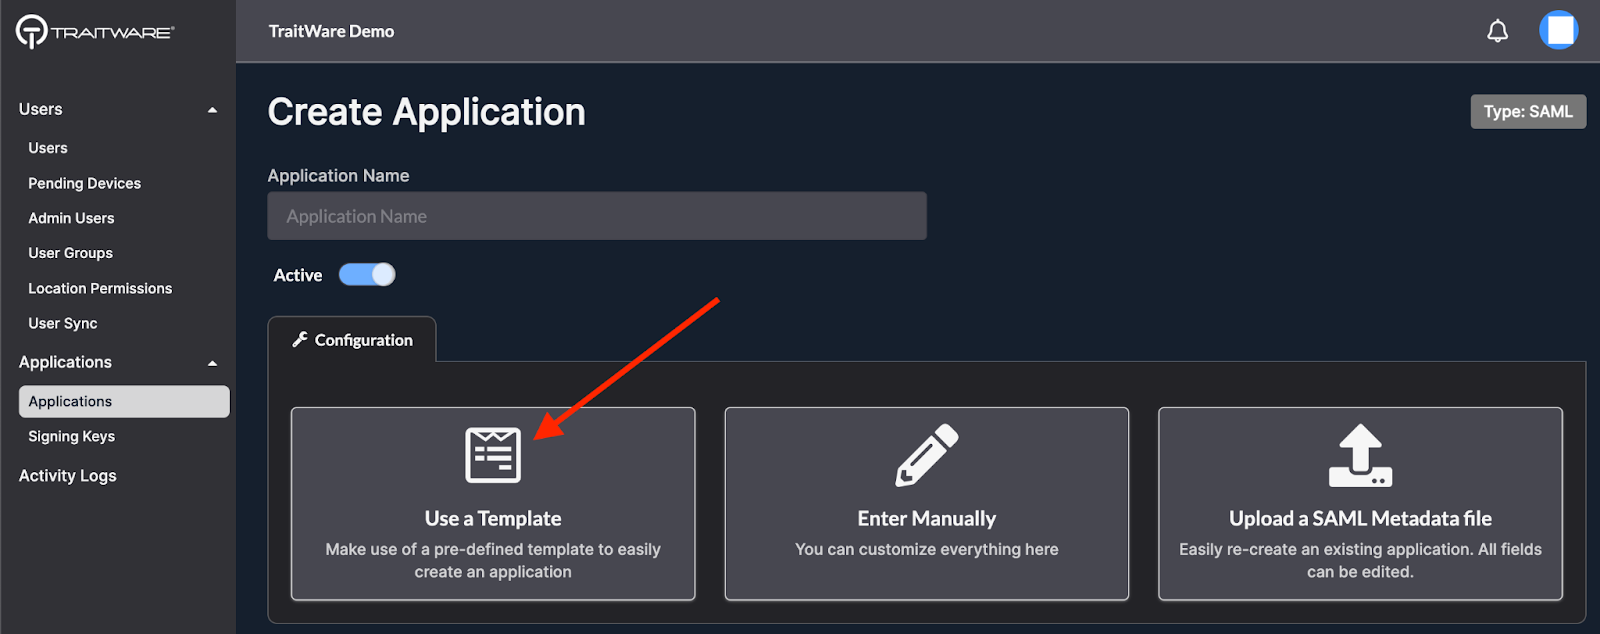
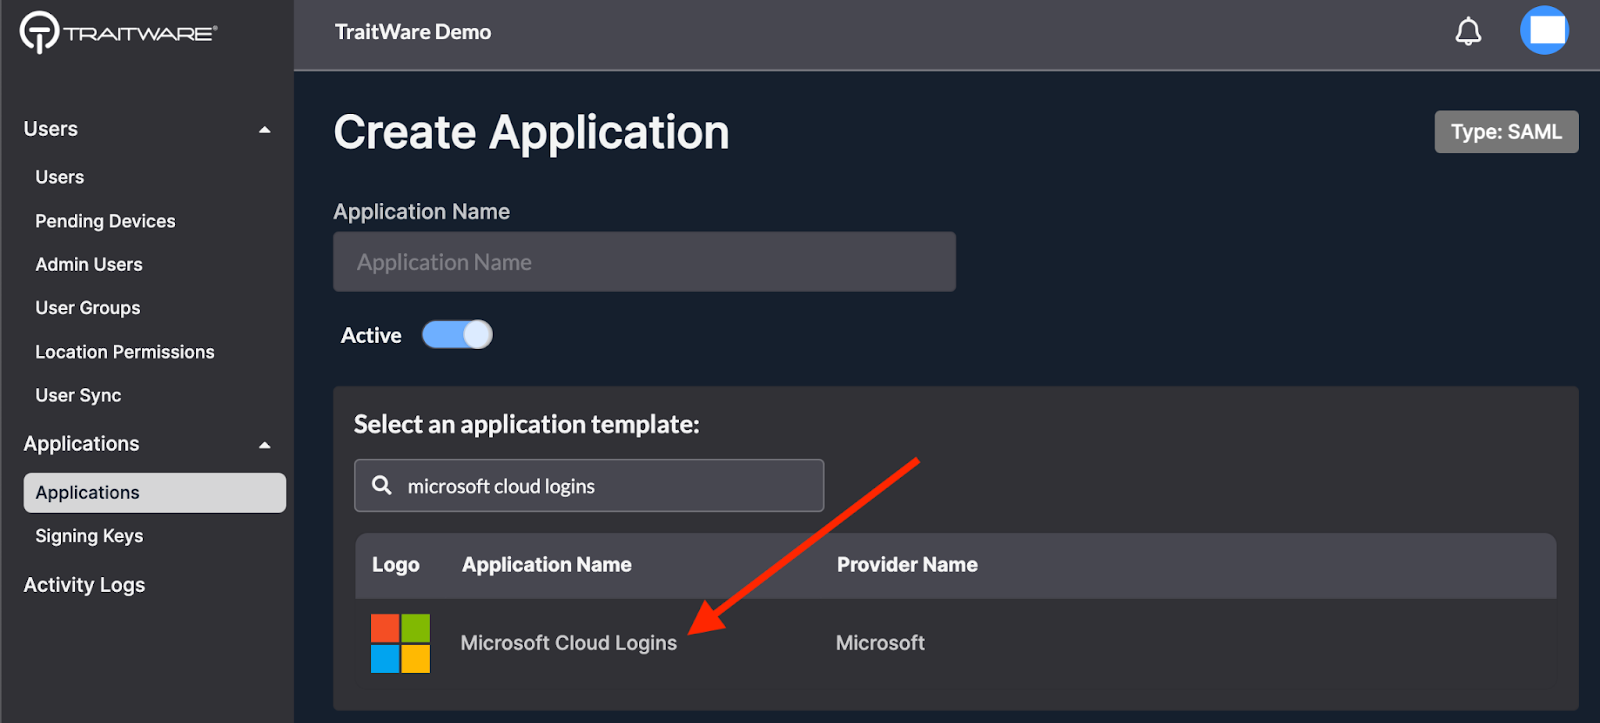
- Search for ‘Microsoft’, select Microsoft Cloud Logins, and click Submit.
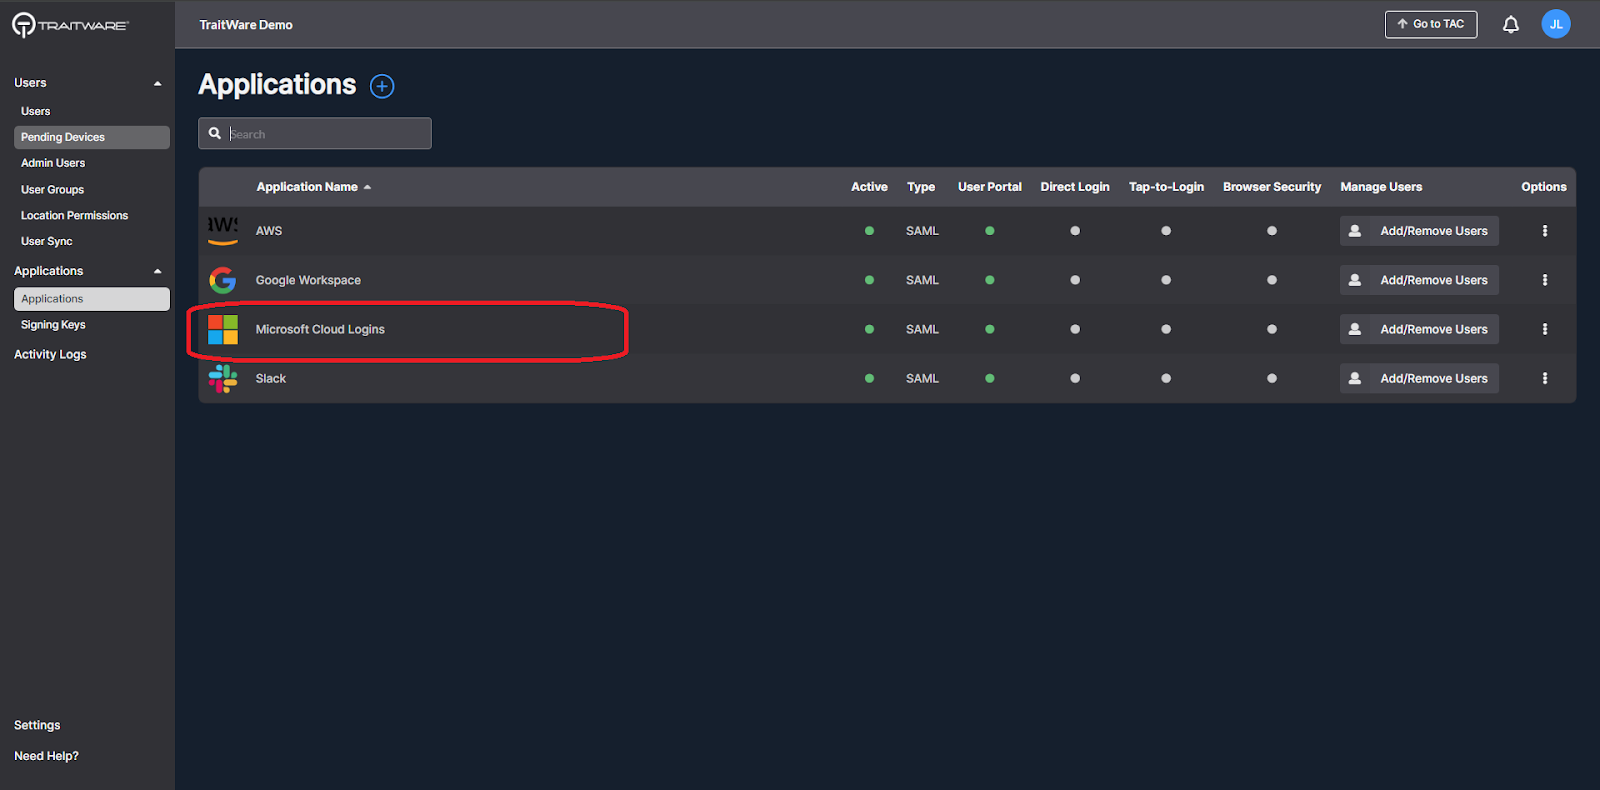
- Select the newly-created application.
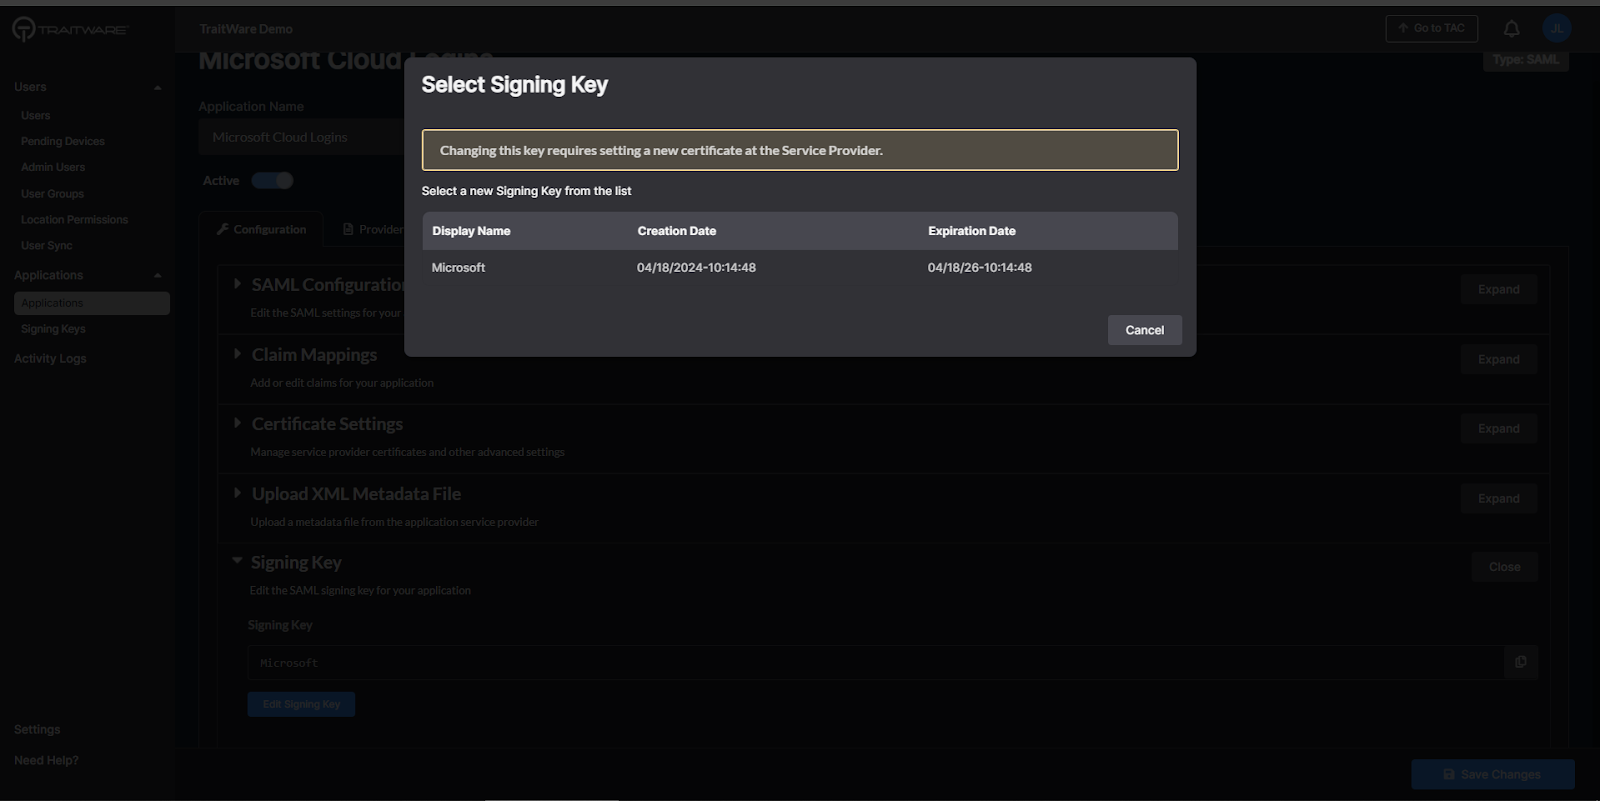
- Click on Signing Key under the Configuration tab to expand that section. Click Edit Signing Key.
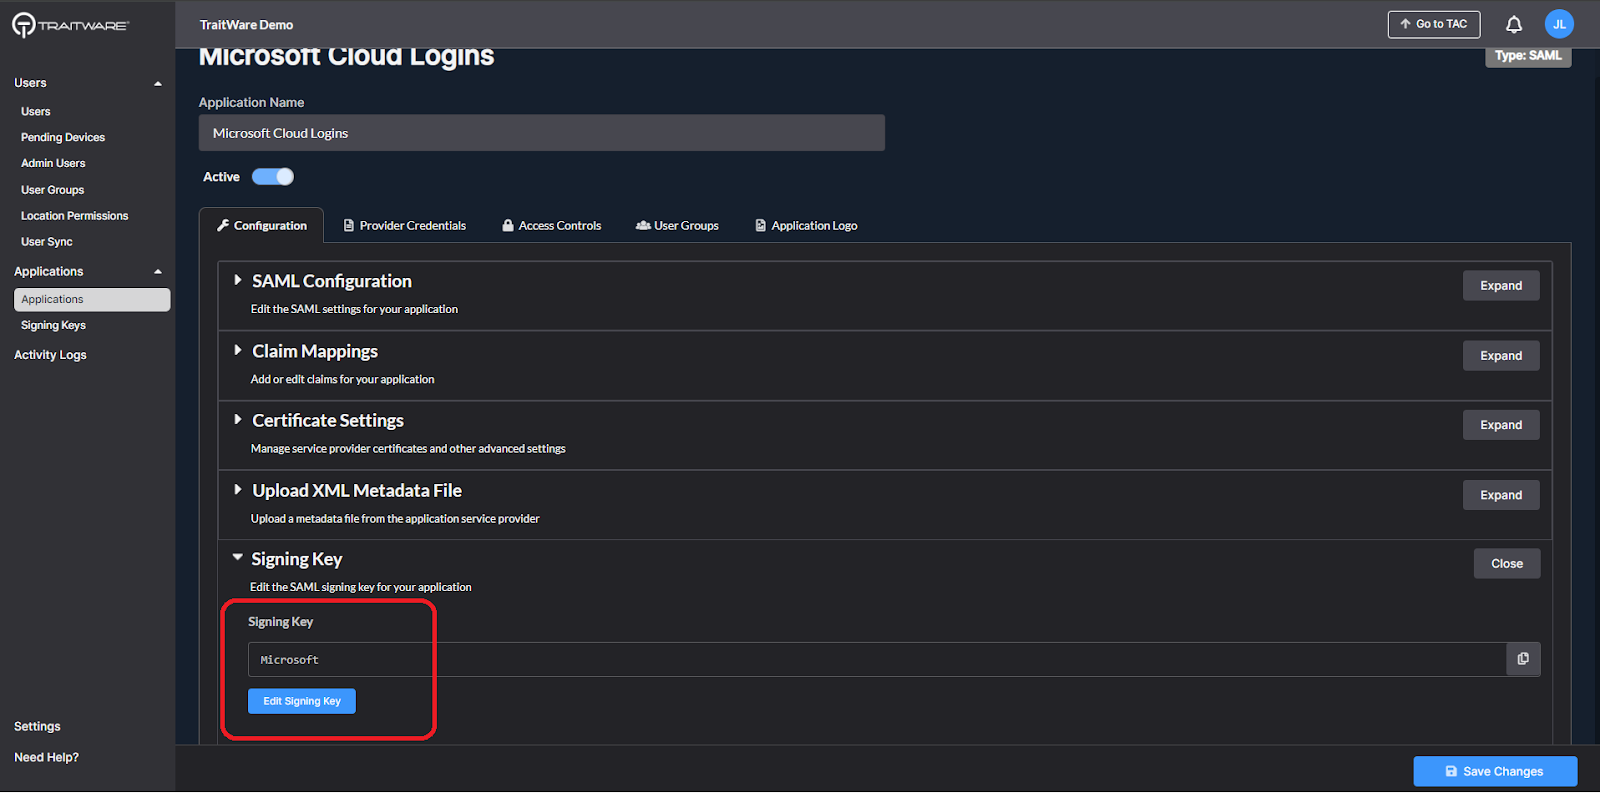
- Select the previously-created signing key.
- Click the Provider Credentials tab to find information needed for the Powershell federation script.
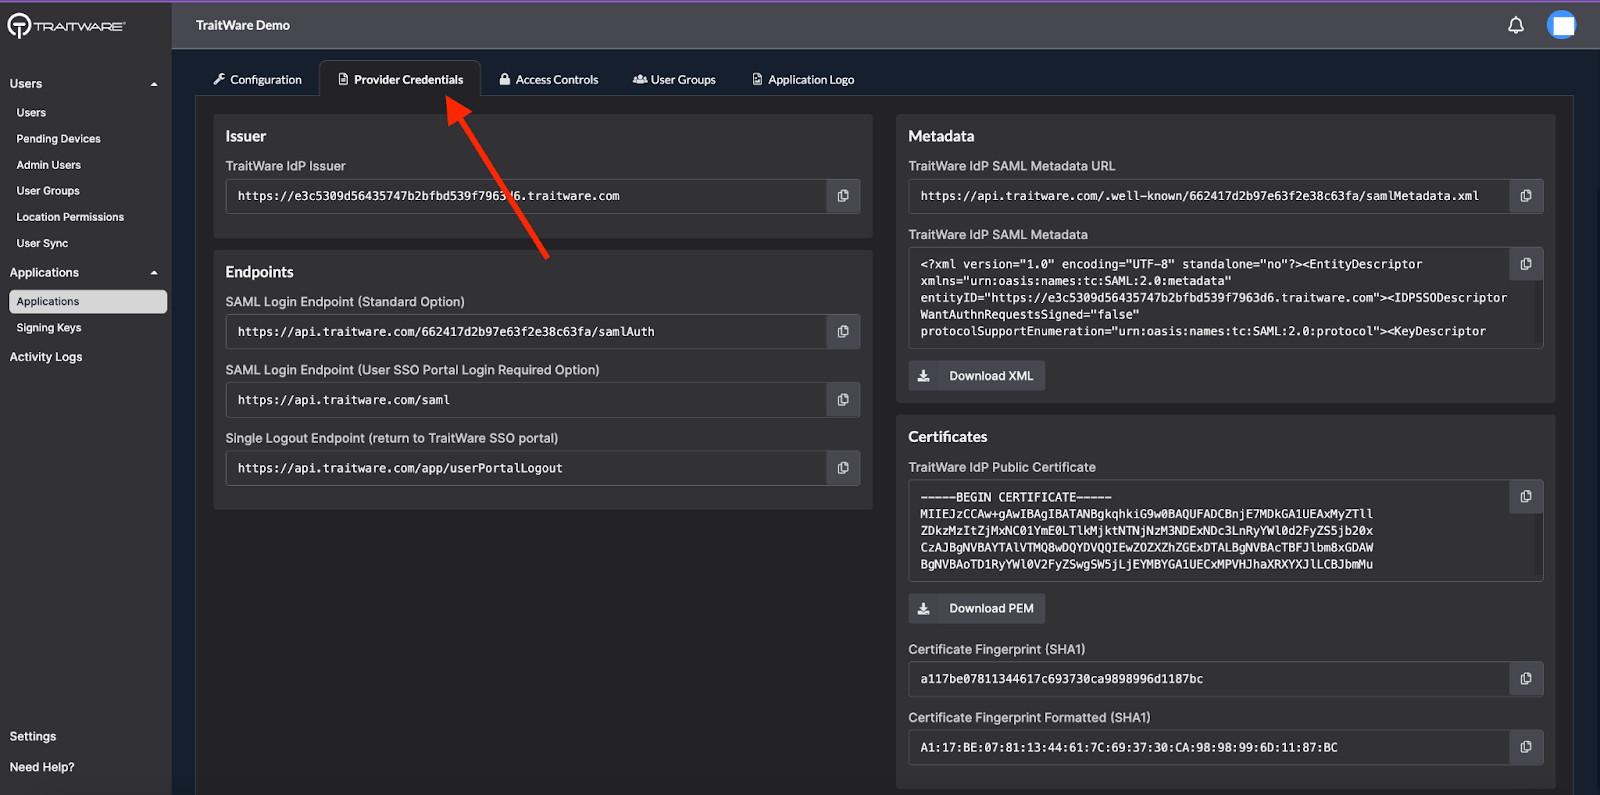
- Click the Provider Credentials tab to find information needed for the Powershell federation script.
Running the Powershell Script
Prior to executing the Powershell commands, please ensure that the following have been completed and are available:
- Global User Created (within the onmicrosoft.com domain)
- More than one verified domain
- TraitWare SAML Endpoint
- TraitWare SAML Signing Certificate
- TraitWare Issuer
- Open Powershell (ISE is recommended for ease of use).
- Install the MsOnline Module in Powershell by running the following command:
| Install–Module MsOnline |
- Select Yes to all and let the scripts run. Once that is complete, connect to Azure using the Global Admin credential and run the following:
| Connect-MsolService |
- A window will open up, enter the Global Admin username and password. The next step will federate the domain:
| Set-MsolDomainAuthentication -Authentication Federated -DomainName yourdomain.com -IssuerUri https://YOURURI.traitware.com -LogOffUri https://portal.office.com -PassiveLogOnUri https://api.traitware.com/YOURACCOUNT/samlAuth -SigningCertificate YOURCERTINFORMATION -PreferredAuthenticationProtocol SAMLP |
- An example of this would be:
| Set-MsolDomainAuthentication -Authentication Federated -DomainName yourdomain.net -IssuerUri https://e423gfe9895fs65fe882zxf10ffa14bde9.traitware.com -LogOffUri https://portal.office.com -PassiveLogOnUri https://api.traitware.com/9212345657/samlAuth -SigningCertificate “—–BEGIN CERTIFICATE—–MIIDrjCCApYCCQCzQmtkoNSgCTANBgkqhkiG9w0BAQsFADCBmDELMAkGA1UEBhMCVVMxEzARBgNVBAgMCkNhbGlmb3JuaWExR7tXlCm2Q6g2A/3OAyJ67HaprL+pYo2RB0TEsugF584T4CcWAljLC2S5a0vBS0cNknJKNBSW/A3SVEYLw0IlL4OyJYQUkkbbeSihEx6Cw83GFlLMhXHhPcTFv44Hu0Bq4Z3FDASBgNVBAcMC05ldmFkYSBDaXR5MRIwEAYDVQQKDAlUcmFpdFdhcmUxDDAKBgNVBAsYDVQQLDANJRFAxFjAUBgNVBAMMDXRyYWl0d2FyZS5jb2MA0lEUDEWMBQGA1UEAwwNdHJhaXR3YXJlLmNvbTEkMCIGCSqGSIb3DQEJARYVc3VwcG9ydEB0cmFpdHdhcmUuY29tMB4XDTE4MTExOTIxNDM0MloXDTI4MTExNjIxNDM0MlowgZgxCzAJBgNVBAYTAlVTMRMwEQYDVQQIDApDYWxpZm9ybmlhMRQwEgYDVQQHDAtOZXZhZGEgQ2l0eTESMBAGA1UECgwJVHJhaXRXYXJlMQwwCg0xJDAiBgkqhkiG9w0BCQEWFXN1cHBvcnRAdHJhaXR3YXJlLmNvbTCCASIwDQYJKoZIhvcNAQEBBQufBFIGS37fyzVqM4pNiWn2FpByzJocf+Cc6IZ+5IHm0eH98asHnE+cKQLdXMJiwP/z1k8ZhUjK0lRyoDFJsL+zi7r5u6g1dSGL+nqAgdFxsedxgEw6uGBp0QWYsgraqOt3JLFO7HD+zysKtrihbg9Gdqx02ROd7HeFk2h8fDxA2sUCHO90zqokMKqLag42ze4zPayy4K5PsQ+ihLhXWqTq5azEi4Yo9E0QfYIMpqXgHMIXgwdYp2E2K6phnsH9tQCSYeqH4jAU4T1o+2PigHfnYzMpwienx+lQsJ1ode9mFpXECAwEAATANBgkqhkiG9w0BAQsFAAOCAQEAnpNNkESZCU+QADggEPADCCAQoCggEBAK/GwBauAinkRfhbNLn4rPEUU6p4JyWOODyWLgjTQnJVNsEsn5Xa9v7iNJ/4J68XzU9EICZ1mtCNLa+v0OtSulBVnpJgjs3K6KSMTAzIm4y80qhHaPOqr2iiXh36PZatapqxZQBqMyXCTai6Q8wnMiwJl8NWxKhnzrPnbGup68Fu9FppvrbL9ITom7g4TiJyR8YaYW4SR/4v0rn49f4WtR42jZO/Qxy2W4LIpmATZjl/dlCg== —–END CERTIFICATE—– ” -PreferredAuthenticationProtocol SAMLP |
- If it is required to change the domain back to managed, run the following after Connect-MsolService:
| Set-MsolDomainAuthentication –Authentication Managed -DomainName domain.com |
Note: This will disable TraitWare authentication for the Microsoft domain.